| ID |
Date |
Author |
Category |
Type |
Subject |
|
17
|
Friday, May 15, 2015, 11:06 |
Isaac Earle | 100KW Beam Dump | Development | BD and Upper Pb Shield Water Hoses Replaced |
The beam dump and upper lead shield flexible hose assemblies have been replaced with smaller diameter versions to allow for easier remote handling. The new beam dump hoses are TEL5501 (Rev A) & TEL5502 (Rev A). The new upper lead hoses are TEL5503 (Rev B) and TEL5504 (Rev B). All Swagelok joints were installed 1-1/4 turns past finger tight as per Swagelok instructions. The new Swagelok connections have not been leak tested yet. This will be done after the remote handling test of the vacuum seal and water block which is scheduled to begin on May 27th. |
|
18
|
Thursday, May 28, 2015, 16:08 |
Isaac Earle | 100KW Beam Dump | Development | Beam Dump Vac Seal RH Test & Installation |
The following work was performed on May 27 & 28, 2015:
- The beam dump 10kW Remote Handling setup was arranged as shown in the attached procedure
- The EHDT split ring clamp was found to be installed too far downstream and the pole tool could not be installed properly; the position was adjusted
- The cuff of the previously installed used seal was found to be damaged because it was not located properly on the EHDT side flange at the bottom when the clamp was closed. Thorough inspection (visual from top, camera for bottom) must be used in the future to prevent this from happening again
- Flange gap was measured with the beam dump in far upstream and downstream positions: .190" and .762"
- Seal width is 0.255", and cuff width is 0.475", giving 0.297" clearance for installation, and .065" bellows compression when closed
- EHDT beam pipe was adjusted approximately 0.125" downstream to give more bellows compression with seal installed and the BD advanced upstream
- New flange gaps: 0.083" and 0.649; New instillation clearance: 0.174"; New bellows compression: 0.172"
- Two trial seal installations were performed according to the attached procedure (no major issues encountered)
- A new helicoflex seal was used for the final installation (also according to the procedure). One of the clamp jaws did not seat properly around the flanges at beginning of travel; this was overcome by backing up 1/4 turn and adjusting the clamp angle to get the jaws seated properly. After this the clamp closed normally.
- A helium leak check was performed by Anothony Ip from Vacuum Group: No leaks found!
See attached procedure for full details and photographs (updated document uploaded June 2 to include comments from Ron K.) |
| Attachment 1: BD_Vac_Flange_RH_Test_Procedure_-_June_2_2015.docx
|
|
19
|
Tuesday, June 02, 2015, 16:42 |
Isaac Earle | 100KW Beam Dump | Development | Beam Dump Water Block RH Test & Installation |
Beam dump waterblocks #1 (BD Inlet) and #3 (Upper Pb Inlet) were removed as per the attached procedure on June 1-2. The following was noted:
- The RH pole tool (TRH1244) and water tool wrench (TRH1243) fit easily over all four water block nuts and was easy to use
- The rubber nut thread tool was sometimes difficult to located in the hole on the water block (WB) lower half body, could be done after a few attempts, perhaps tool locating feature can be improved
- The rubber nut thread tool worked well, but a new one should be made as it is starting to degrade and drop pieces of rubber
- The WB upper halves must be lifted carefully with the pole tool supported well to prevent them from swinging in the east direction due to water hose stiffness
- The gasket/retainer assembly on the WB lower half is likely to become dislodged when removing the WB upper half.
- A tool must be developed for picking up the old gasket w/o damaging the WB lower half gland (could simply be a plastic hook attachement)
- A tool must be developed for placing a new gasket on the lower gland (concept in progress by Keith Ng)
- Installation of the upper water blocks (#3 and #4) may require assistance with a hook tool to get the upper WB in the correct orientation. The lower water blocks (#1 and #2) should not
See attached procedure for full details and photographs. More photos and videos of the procedure are stored on Isaac Earle's hard drive. |
| Attachment 1: BD_Water_Block_RH_Test_Procedure_-_June_2_2015.docx
|
|
20
|
Monday, June 08, 2015, 15:15 |
Isaac Earle | 100KW Beam Dump | Development | Beam Dump Vacuum Leak |
- On Thurdsay June 4th the EHDT beamline section was vented by Vacuum Group so that they could install a new pump
- After pumping down again a leak was found at the BD front flange seal around the top of the seal
- The RH clamp and Helicoflex seal were removed and an o-ring seal was installed with a band clamp
- The EHDT section was pumped down and leak check performed - no leaks
- While the EHDT section was vented both flanges were measured and found to be in spec (see attached PDF)
- The clamp jaws were also checked and were in spec (see PDF)
- Seal was inspected: delta fully crushed at bottom, but a visible ridge remained around the top
- A meeting was held on June 5, with Grant Minor, Isaac Earle, Keith Ng, and Bill Paley in attendance. Meeting minutes copied below:
Meeting Summary:
- We suspect the leak is caused by inadequate seal compression
- The leaks on this installation may be because of the new batch of seals which are thinner (by ~0.006") and have a less pronounced delta (all the successful installations on 2A are using the old batch of seals)
- It is possible that the recent bench tests performed with the new batch of seals also had very small leaks that were not detectable with the "Star Wars" leak detector
- The clamp must be modified to achieve the manufacturer seal compression spec (currently 0.020" short)
- We will not pursue testing of clamp closure beyond the point where the jaws are concentric (0.685" stop-ring)
Actions:
- As a temporary measure a seal from the old batch will be installed at the e-dump next Monday (Keith, Isaac, Bill)
- Modified clamp jaws, to achieve design seal compression, will be designed/ordered (Keith), and bench tested (Keith, Isaac/Bill)
- We will pursue purchase of a new leak detector for the lab. If leak checking is required before then we will borrow a modern detector from Vacuum Group (Isaac)
- If the old batch seal installation at the beam dump is leak tight, we will still switch to a new seal and modified clamp jaws once development is complete and an opportunity to swap presents itself (Isaac) |
| Attachment 1: BD_Flanges_and_Clamp_Jaws_Dimension_Check_-_Keith_Ng_-_June_5_2015.pdf
|


|
|
21
|
Monday, June 08, 2015, 15:23 |
Isaac Earle | 100KW Beam Dump | Development | Beam Dump Seal Re-Install |
On Monday June 8 the following work was performed by Isaac Earle and Keith Ng:
- EHDT beamline vented
- Band clamp and o-ring seal removed
- Flanges cleaned with methanol and Kimwipe
- Flanges inspected visually: clean and scratch free
- New seal prepared as per TEL5568 from old 1997 batch of seals (as decided at Friday June 5 meeting)
- Seal cleaned with methanol and Kimwipe
- Seal installed remotely following procedure attached to Ariel E-Log #18 (install went smoothly, no catching of clamp jaws)
Rocking the clamp back and forth while tightening seemed to be a good technique to avoid jaws catching on outside of flanges
Clamp began getting stiff with around 5/8" of gap remaining to stop ring. It gradually got stiffer as travel progressed until reaching hardstop
- Inspected visulally close up: all appeared normal
- Vacuum pumped at 10:15am, Leak check performed around 11:30am - Leak tight
- Will leave the BD under vacuum for a few days, then attempt to vent, repump, and repeat leak check (which caused failure before)
- RH bridges removed to allow water lines in north-west corner to be reinstalled
|
|
22
|
Wednesday, June 10, 2015, 14:57 |
Isaac Earle | 100KW Beam Dump | Development | BD Water System Leak Test |
A leak test was performed on the beam dump water system on June 9 in the afternoon.
- Pipe segments tested: The entire HAW system except for the expansion tank, air separator and HAW pump
- Test medium: air
- Test pressure and duration: 60 minutes at 50psi with no loss in pressure
- Swagelok joints and VCR joints around the beam dump which had been opened since last test were sprayed with Snoop: no bubbles |
|
23
|
Friday, June 12, 2015, 10:16 |
Isaac Earle | 100KW Beam Dump | Development | Beam Dump Vac Seal Vent & Test |
- Vacuum has been pumping steadily on the EHDT section since June 8, reaching 3.2E-8 Torr at 8am today (June 12)
- Leak check performed this morning by Anthony Ip: no leaks
- Vacuum vented and re-pumped, leak check repeated: no leaks
- Reached 5.0E-7 Torr by 9:20am
Installation of shielding over the beam dump will begin next Tuesday. |
|
24
|
Monday, June 15, 2015, 17:08 |
Isaac Earle | 100KW Beam Dump | Development | E-Dump Shielding Installation |
- The hoist rings were removed from the upper lead shield
- Two standard lock-blocks were installed over the E-Linac beam dump according to TSH0372
- 5/8" of shims were required on the north end of both blocks to make them level. Aluminum shims were used (1/2" + 1/8")
- The service stand plug was also installed using a cable sling and chain-fall pulley setup prepared by Neil Wong (tight fit with surrounding shielding, but the install went smoothly)
- No change in EHDT vacuum (approximately 3.0E-8 Torr)
- The modified block TSH0487 is now required. Installation will continue once it is ready. |
|
25
|
Wednesday, June 24, 2015, 15:19 |
Isaac Earle | 100KW Beam Dump | Development | Remainder of BD Shielding Installed |
The location of the already installed blocks including the TSH0392 protruding lift bails were remeasured, and it was found that modification of the Standard Lock-Block Flat Top block was not required. A Standard Lock-Block Flat Top block was installed in the place of TSH0487 in drawing TSH0372, and the remainder of the blocks on top were installed. It was a tight fit for the lower two Half Height Lock-Blocks, but future removal of the BD shielding and SS plug should still be possible. Drawing TSH0372 will be updated to reflect as-built status. |
|
26
|
Tuesday, November 03, 2015, 13:15 |
Isaac Earle | 100KW Beam Dump | Development | Initial tests of beam dump water system controls |
During the maintenance period today the E-Hall tunnel was accessed to begin controls tests on the beam dump water system and initial fill of the system. This work was done by Bill Richert and Dave Morris while I observed. Before work began I verified that pressure relief valves were installed as per the P&ID (TEL5104 Rev A) - they have been installed but the exhaust ports from the valves have not yet been routed to the active drain. They first tested the hydrogen venting and measuring system in the E-Hall and all seemed to work properly. Next, in the tunnel Dave confirmed that he was able to actuate the solenoid valve used for filling the system from EPICS. Next the pressure sensor used to determine expansion tank level was tested - although not calibrated properly yet they were able to confirm that it is wired correctly and responding as expected. Upon inspection of the pump it was found that the pump motor was not mounted properly to the support plate below (this should have been done by the supplier before delivery). Because the pump cannot be run in this state it was decided not to fill the system at this point. Bill Richert will have the pump properly mounted before the system is filled, possibly during the two day maintenance period next week. |
|
28
|
Thursday, April 07, 2016, 11:25 |
Isaac Earle | 100KW Beam Dump | Development | Result of VCR Gasket Corrosion Test |
In August 2014 gasket corrosion tests were prepared by placing a 1" Swagelok VCR gasket in a 500mL beaker with de-ionized water and a 1"x3/4"x1/8" piece of 6061 aluminum. Tests were prepared for a silver plated 316L SS gasket (Swagelok PN: SS-16-VCR-2), a silver plated nickel gasket (PN: NI-16-VCR-2), and a TRIUMF made 0.060" thick 6061 Al gasket. The top of the beakers were sealed, and they were left to sit until March 2016.
The Nickel and SS gaskets show no noticeable corrosion. The aluminum gasket became dull in colour, with some corrosion visible on the surface. See attached photos of each gasket. The gaskets have been bagged and stored with beam dump spare parts in the NW corner of the RH Meson Hall hot cell lab. |
| Attachment 1: IMG_7003.JPG
|

|
| Attachment 2: IMG_7004.JPG
|

|
| Attachment 3: IMG_7005.JPG
|

|
| Attachment 4: IMG_7006.JPG
|

|
| Attachment 5: IMG_7007.JPG
|

|
|
40
|
Wednesday, March 13, 2019, 16:14 |
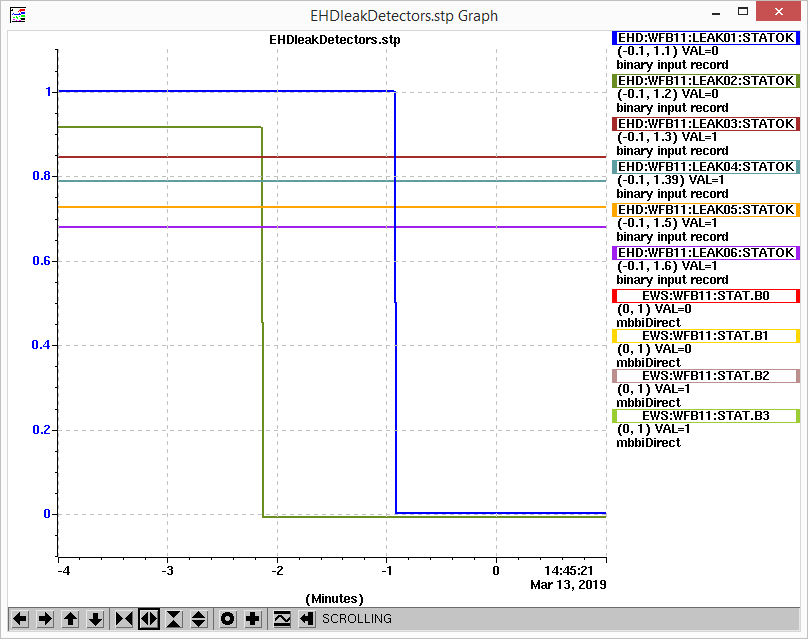
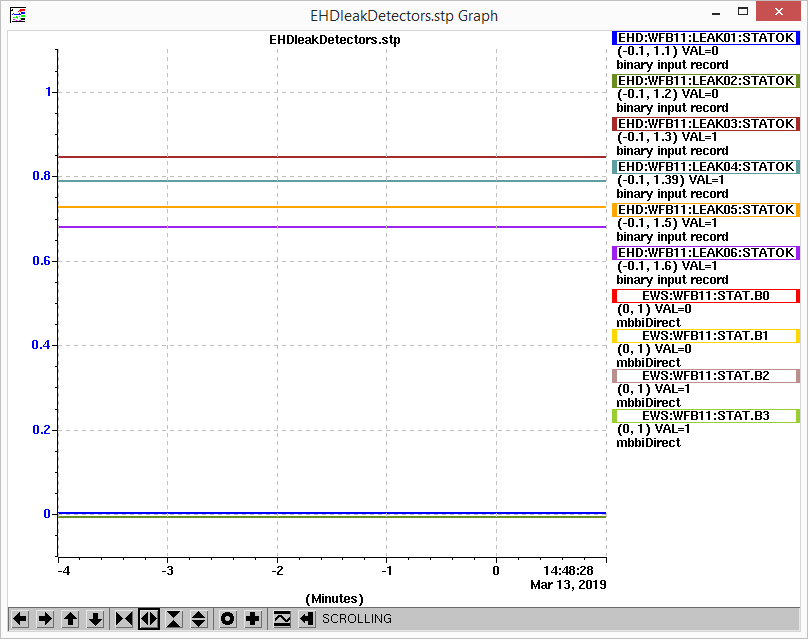
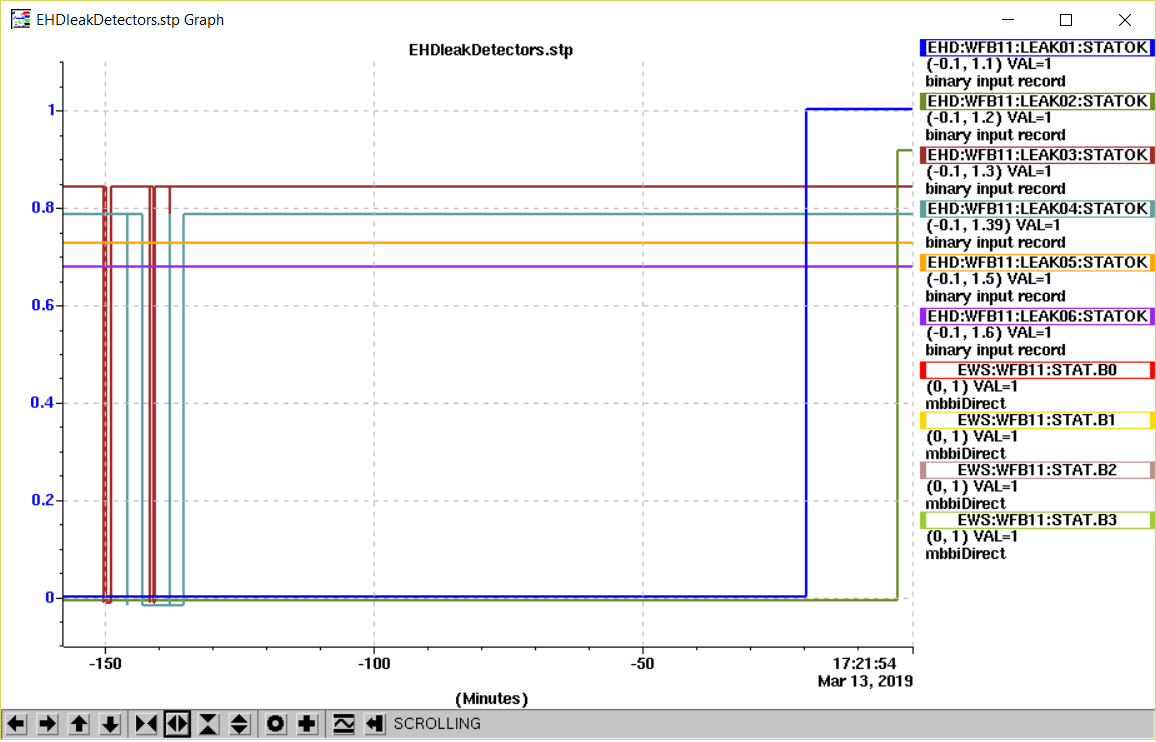
Isaac Earle | 100KW Beam Dump | Development | Testing EHD water leak detectors |
The following work was completed today on the EHD water leak sensors:
- Mike Vogel installed a 1/4" copper tube which leads from the east side of the EHDT shielding down to the catch tray below the water blocks. This can be used for future testing of the in-tray sensors without removing the shield blocks. It may also be possible to test the other sensors if enough water is poured into the tray for it to overflow and eventually get them wet. The routing of the copper tube is not expected to interfere with the vertical shield plug
- Ray Mendoza re-located the SMT circuit boards to a rack on the north wall of the E-Hall, east of the concrete shield wall. The push-connect terminal on one board was damaged, so there is currently no electronics installed for EHD:LEAK06 (After various debugging over the last couple weeks it was eventually determined that the previous problems with these sensors was caused by a shared power source for the relays and the sensors themselves. Ray installed a dedicated 9V power supply for the sensors, with 24V supply to the relays still coming from the PLC)
- We swapped the wiring of two of the sensors so that LEAK01 and LEKA02 are the strips located in the tray as specified in interlock spec Document-112445 (see below for details of final installation)
- Inside tray east side sensor is cable #4, wired to EHD:LEAK01
- Inside tray west side sensor is cable #2, wired to EHD:LEAK02
- Outside tray east side sensor is cable #3, wired to EHD:LEAK03
- Outside tray west side sensor is cable #1, wired to EHD:LEAK04
- After the wiring was completed we shorted across each sensor in the junction box near the beam dump. EHD:LEAK01 through LEAK05 responded as expected
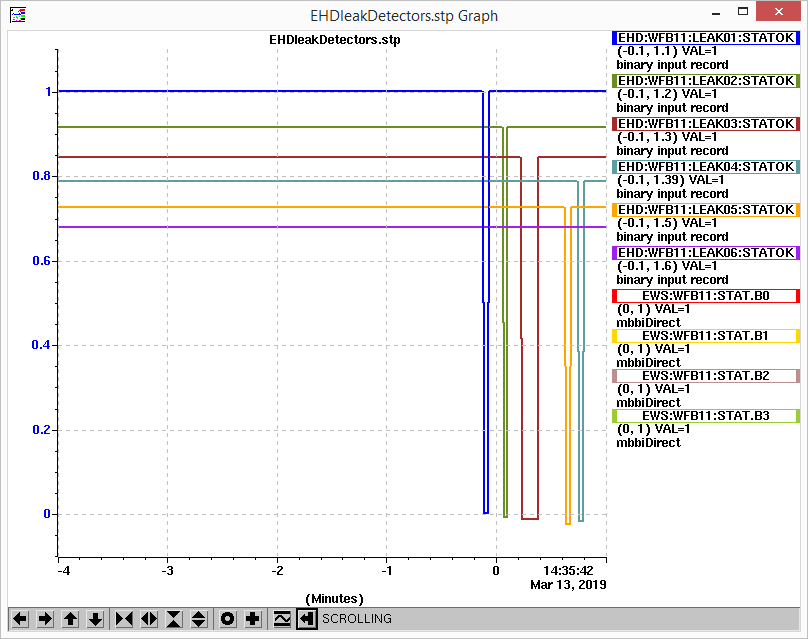
- Water was poured into the 1/4" copper tube to test the sensor strips in the tray. After approximately 50mL sensor #2 triggered, and #1 triggered after approximately 100mL total. Both sensors were still in alarm 5 minutes later.

- Water was applied to sensor #3 (outside tray, east side) using a snake camera with plastic tube attached. Approximately 50mL was applied; The sensor triggered once after a small amount of water reached the strip, came out of alarm, then went back into alarm when more water was applied. It stayed in alarm for approximately 1 minute then cleared
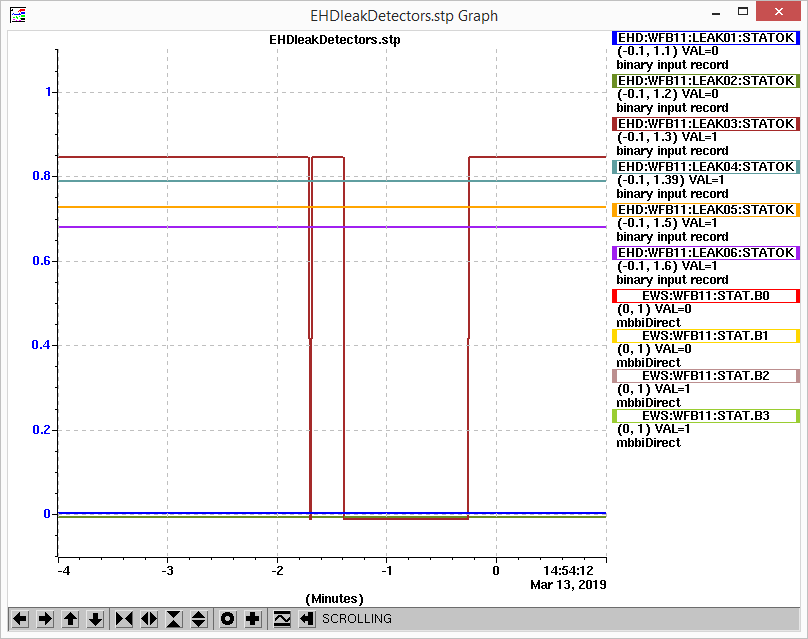
- EHD:LEAK04 (outside tray west side) was triggered by pouring water onto the ground in the general area of the sensor (direct application with the snake camera was not possible). 125mL was initially poured which did not trigger the sensor. An additional 125mL was applied which triggered it. More water was added to the LEAK03 sensor to confirm that the system behaves properly with all 4 sensors in alarm
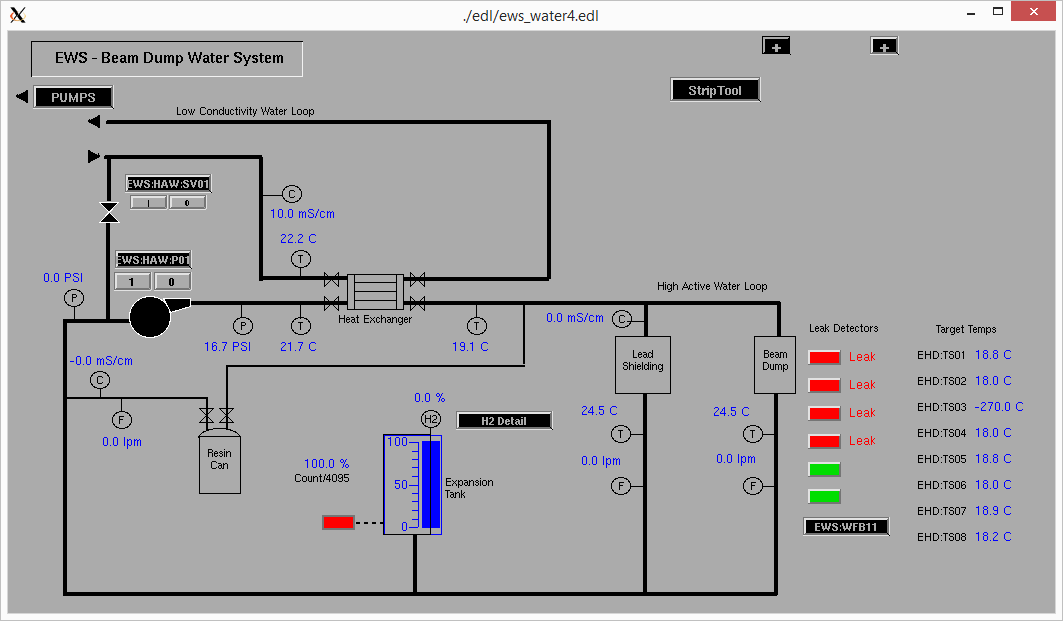
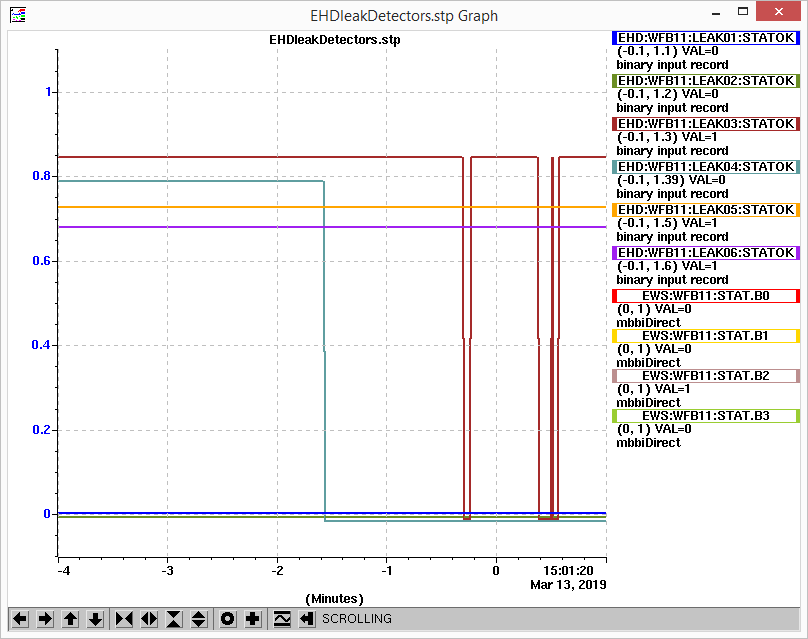
- Air was forced down towards the sensors using a shop-vac hooked up in reverse. LEAK03 and LEAK04 cleared within a couple minutes. LEAK01 and LEAK02 cleared in approximately 2 hours.
|
| Attachment 6: strip_5.png
|

|